DTF transfers have revolutionized apparel printing, offering durable, vibrant results for a wide range of fabrics. As you explore DTF printing and direct-to-film transfers, you’ll discover a flexible workflow that supports quick iterations. This introductory guide covers best practices from design to finished tee, with DTF transfer design tips that help you optimize color, layout, and underbase. Compared with other methods, DTF transfers vs screen printing often delivers better color saturation and a softer hand feel, while staying cost-efficient for small runs. A reliable heat press for DTF setup and meticulous pre-press steps create consistent results across batches.
In other terms, this approach can be described as a film-to-fabric transfer workflow that uses a coated carrier film to carry the image. The process begins with artwork preparation, proceeds to printing on film, dusting and curing adhesive powder, and finishes with a heat-press to bond the design. This film-based method sits alongside DTG and vinyl transfers, offering advantages in color versatility across fabrics and straightforward batch handling. For best results, emphasize design planning, white underbase considerations, and precise press parameters to ensure durability and wash-fast performance.
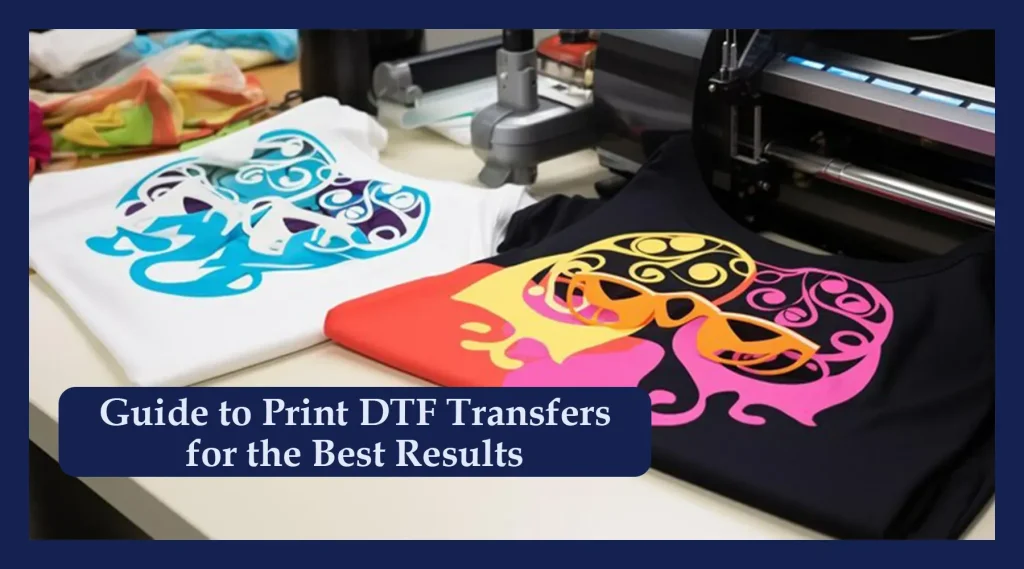
DTF transfers 101: Printing Fundamentals for Direct-to-Film Transfers
DTF transfers, or Direct-To-Film transfers, rely on a specialized workflow that moves a printed design from film to fabric with adhesive powder and heat. This method blends the flexibility of traditional dye-sub-style colors with the durability and soft hand feel associated with modern transfers. When executed correctly, DTF printing can reproduce vibrant hues, sharp details, and white underbases on a wide range of fabrics, making it a practical option for single custom tees or small batch runs.
Preparing artwork for DTF transfers starts with thoughtful design and color management. Focus on high-resolution files (at least 300 DPI at final size), plan for the white underbase, and save layered PNGs with transparent backgrounds where appropriate. Separating colors in a clean palette, and, when possible, exporting vector elements (AI or EPS) helps maintain edge crispness. A well-planned print file reduces surprises during the printing and transfer stages and supports consistent results across batches.
DTF transfer design tips: color separation, underbase, and art prep
Effective DTF transfer design hinges on how you handle color separation and white underbase. The white layer acts as the base for all subsequent colors, especially on dark or colored garments, so precise density and coverage are critical. By planning for the white ink early and testing different separations, you can preserve brightness and prevent color shifts after transfer.
In addition to white underbase planning, the design tips for DTF transfers emphasize scalable, bold visuals and clean edges. Use RGB workflows that translate well to print, test on similar fabrics, and employ a printer-friendly palette to minimize color drift. Layering strategies should consider how colors interact with the adhesive powder and the film carrier, ensuring a predictable translation from screen to fabric while maintaining a solid hand feel.
DTF transfers vs screen printing: when to choose each method
DTF transfers offer a compelling balance of color fidelity, durability, and fabric versatility, particularly for small to mid-sized runs. Compared with traditional screen printing, DTF can deliver vibrant color on more garment types and may reduce setup time for short runs. This makes it a strong competitor when you need detailed imagery, white ink, or rapid turnaround without multiple screen setups.
Choosing between DTF transfers and screen printing depends on factors like run length, fabric types, and desired hand feel. If you’re prioritizing cost efficiency for small batches, or require a full-color image with strong white highlights on varied fabrics, DTF often comes out ahead. Conversely, for very large orders on consistent fabric, screen printing may offer lower per-unit cost and a traditional, proven workflow.
Heat press for DTF: optimal temperatures, times, and pressure
The heat press stage is central to successful DTF transfers. A solid starting point is pre-pressing the garment briefly to remove moisture, then applying the printed film with even pressure. Typical ranges fall around 305°F (150°C) to 320°F (160°C), with a pressing time of 8–15 seconds. The goal is a smooth transfer with consistent impression and clean color retention, so monitor temperature and pressure closely.
After pressing, allow the garment to cool briefly before removing the carrier sheet to preserve color stability. Depending on your film and fabric, a second light press may be beneficial for high-stress areas like sleeves or hems. Maintaining uniform pressure across the platen and ensuring proper film alignment will help prevent uneven adhesion and post-wash peels.
Finishing, curing, and care for durable DTF transfers
Post-press finishing and curing are essential for durability. After transfer, let the tee cool completely, then inspect for any edge issues or incomplete adhesion. Removing the carrier film carefully and following garment care instructions supports long-term color retention and wash durability.
Care guidance for DTF transfers emphasizes gentle washing and avoiding harsh chemicals. Turn the shirt inside out, use cold water, and air dry or tumble on low heat to extend the life of the print. By documenting and standardizing your finishing and care steps, you can improve reliability across batches and ensure that designs maintain their vibrancy through repeated wears and washes.
Frequently Asked Questions
What are DTF transfers and how do they work in the DTF printing process?
DTF transfers, or Direct-To-Film transfers, start with a design printed on a carrier film using a white underbase and color inks. After printing, a fine adhesive powder is applied and cured, and the film is then heat-pressed onto a garment to produce a vibrant, durable finished tee.
How does DTF printing compare to screen printing (DTF vs screen printing) for small batches?
DTF printing offers full-color capability, a white underbase, and easier setup for small runs and varied fabrics, making it often more economical than screen printing for short runs. Screen printing can be more cost-effective for large batches with limited colors, but is less flexible for whites on dark fabrics.
What are essential DTF transfer design tips to improve results?
Prepare artwork with high resolution (300 DPI), use PNGs with transparent backgrounds for layering over a white underbase, separate colors in a clean palette, plan your white ink layer, and leave margins to avoid edge loss. These DTF transfer design tips help ensure accurate color and sharp edges.
What should I know about using a heat press for DTF transfers?
Follow a reliable heat press for the DTF process: pre-press the garment for 2–5 seconds to remove moisture, press at roughly 305–320°F (150–160°C) for 8–15 seconds with firm, even pressure, then cool before peeling the carrier sheet. Proper temperature, time, and pressure are key for durable adhesion.
What are common issues in DTF transfers and how can I troubleshoot them?
Common issues include color mismatches, peeling, ghosting, and white underbase opacity. Calibrate your printer with test prints to fix color, ensure proper curing of the adhesive powder, verify film alignment to prevent ghosting, and adjust white underbase density to improve opacity.
| Aspect | Key Points |
|---|---|
| What are DTF transfers? | Direct-To-Film transfers place a printed image and adhesive powder on a carrier film for transfer to textiles; they support vibrant colors (including white) on many fabrics and offer durability with a soft hand. |
| Design and artwork preparation | Prepare high-resolution artwork (≥300 DPI), plan white underbase, separate colors, and use PNGs with transparency for layering; consider vector formats for crisp edges. |
| Printing on the film | Print on the carrier film with textile inks and a dedicated white ink channel; use a RIP for color control; print a test sheet and ensure proper film alignment; allow the print to cure before applying adhesive. |
| Applying adhesive powder and curing | Dust adhesive powder evenly over inked areas; cure with heat to activate the adhesive; shake off excess powder and avoid scorching for durability. |
| Transfer to the tee (heat press) | Pre-press garment 2–5 seconds; place film printed side up; press at about 305–320°F (150–160°C) for 8–15 seconds with firm pressure; hot or warm peel; cool briefly before removing carrier; consider a second light press for high-stress areas. |
| Finishing, curing, and care | Cool completely; remove carrier film; wash according to garment care (inside-out, cold water); avoid harsh cleaners and very high heat to protect color and adhesion. |
| Troubleshooting and optimization | Common issues: color mismatch (calibrate printer; adjust white underbase), peeling (ensure proper cure), ghosting (check film alignment), white opacity (adjust white ink density and drying time). |
| DTF transfers vs other methods | Advantages include cost-efficient small-batch production, vibrant colors on a wide fabric range, and durable results; evaluate run size, fabrics, and hand feel to choose DTF over DTG or vinyl. |
| Design tips for DTF transfer design | Leave margins, use bold high-contrast colors, prefer scalable vector artwork, plan for white underbase coverage, and test color densities for accuracy on typical garment stock. |
| Final thoughts and best practices | Adopt a repeatable workflow with careful design, curing, transfer technique, and post-press care to maximize aesthetics and durability across batches. |
Summary
DTF transfers offer a robust pathway from concept to finished tee, combining design intent with precise processing to produce durable, vibrant apparel. An end-to-end workflow—covering artwork prep, film printing, powder adhesion, heat pressing, and post-press care—helps ensure consistent results across runs. By aligning design choices with proper curing, color management, and care guidelines, you can scale production while maintaining color fidelity and soft hand feel, making DTF transfers a versatile option for diverse fabrics and applications.